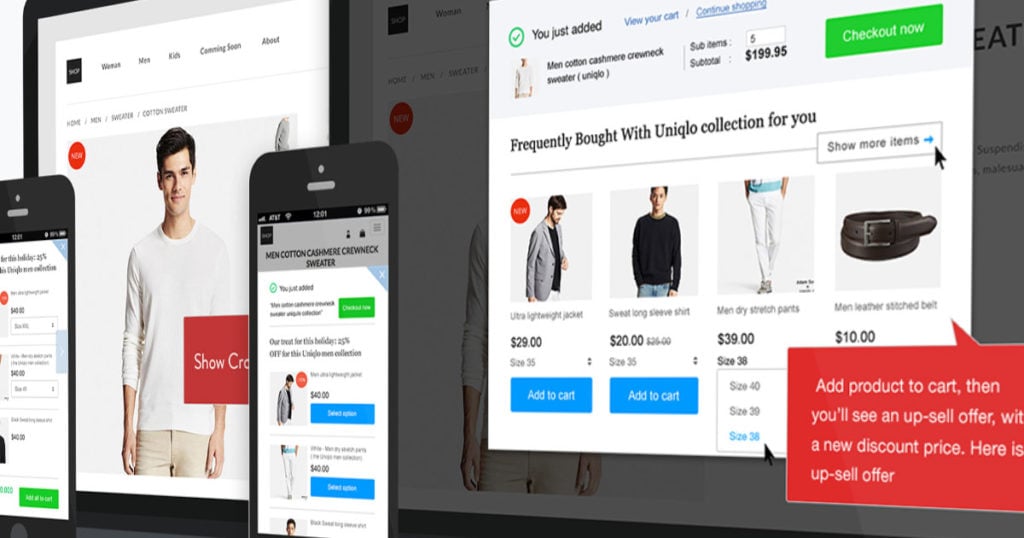
One click upsells are an easy way to increase revenue for your WooCommerce store by offering related products right at the product and checkout pages. You may also think of these as post purchase upsells, since they can happen after the customer clicks purchase.
For a WooCommerce based business, upselling is made easy by a WooCommerce upselling plugin that takes care of all the nuts-and-bolts of the process and takes advantage of custom funnels to make sure every customer is presented with options that help them enjoy their purchase more and eventually add to the store revenues.
So even if upselling is a new thing for you, in this guide, I will make sure that you have a clear idea of how to set up a proper upselling process for your WooCommerce store.
Table of Contents
- What Is WooCommerce One-Click Upsell?
- Why Should You Use A One-Click Upsell?
- How to Set Up Your One-Click Upsell
- Final Words
What Is WooCommerce One-Click Upsell?
Let’s start with the basic definition of upsell. In very simple terms, upselling is the sales tactic where you offer a related product or service in addition to the main product(s) the customer is buying from your store.
Upselling is considered an “easy” tactic because it takes advantage of the fact that the customer is already buying from you and could be easily persuaded to buy an additional product during the transaction.
Since these products and services are related to the main purchase, customers often add them to the cart because of the bundle’s value advantage.
The challenge in setting up a successful WooCommerce upsell funnel is timing – the upsell offer should come at the right time. If it is too early, the customer might not be interested, and if too late, the customer has already closed the transaction and the moment is lost.
This is why you need a WooCommerce post purchase upsell plugin that manages the process and makes sure that the customer does not have to go through the checkout again to buy the upsell offer.
Now that you know the fundamentals of upsell, let’s discuss the idea of one-click WooCommerce upsell. Since upsell works the best near the close of the transaction, a WooComemerce upsell plugin shows the offers at the checkout page to conveniently add the offers to the cart without having to enter their details again.
Also, in effect the trust is already there, there is a huge chance that the customer would click through and increase the size of the order. In effect, it is a win-win for both the customer and the business.
Why Use a One-Click Upsell?
Good question!
Here are four reasons why you should set up a one-click upsell process for your WooCommerce store.
The Retention Factor
Retention is an important business metric for a good reason – it is easier to sell again to a customer rather than find new customers. Upsell helps build the store image as the place where customers can find everything they need at a great price. An upsell offer builds customers’ trust and greatly increases the chances of a repeat sale.
Increased Buyer Satisfaction
Customer satisfaction in this age of choice is very tricky for online businesses. It isn’t easy to meet customer expectations and win them over as fans. With one-click upsell offers, customers get great bargains right when they are most receptive to the deals. Since the upsell deals often complement the main purchase, the user experience is enhanced, resulting in increased customer satisfaction.
Maximizes Average Order Value
You must have seen the candies at the store checkout counters. That’s the great thing about upsell offers – they present products that the customers were not planning to buy in the first place. As a result, when they opt for an offer, the overall cart size increases(directly impacting the revenue). This also increases customer satisfaction as the buy decision adds to the value the customer associates with the overall purchase.
Increased Revenue
The above three factors come together to add directly to the store revenues. Research suggests that upsell offers could increase the revenue by as much as 20%. Since these offers add to the user experience and increase the customers’ trust, this kicks off a generally positive trend for revenue as more and more customers come back for repeat purchases from the store.
Here’s How to Set Up Your One-Click Upsell
Now that you know the essentials of one-click upsell, I will now go into the details of implementing the idea for your WooCommerce store.
Like everything else, I would use a WooCommerce upsell plugin to take care of the actual work to focus on setting up and optimizing the funnels and suggestions. There are a couple of great choices, but I will go with WooCommerce One Click Upsells & Downsells by BogdanFix.
This plugin offers several tools that allow me to set up and manage to upsell funnels and create offers with a good conversion rate. In particular, the plugin offers funnel builder, detailed reporting on funnel performance, and Facebook Pixel integration.
I will start with setting up the plugin and then go into the process of setting up the funnels and offers.
Install The Plugin
Use your preferred method of installing and activating the plugin. I recommend doing it through the Plugins page. After that, the plugin could be found at Plugins > Installed Plugins.

Create The Funnel
Now that the plugin has been installed, the next step is the setting up of a funnel. One-Click Upsells allows you to set up multiple funnels to cater to various sales scenarios. To set up a funnel, go to the plugin’s dashboard (WooCommerce > One-Click Upsells).
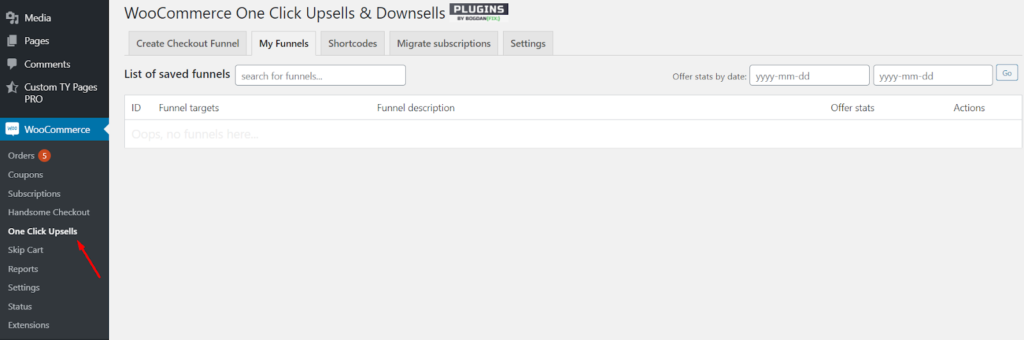
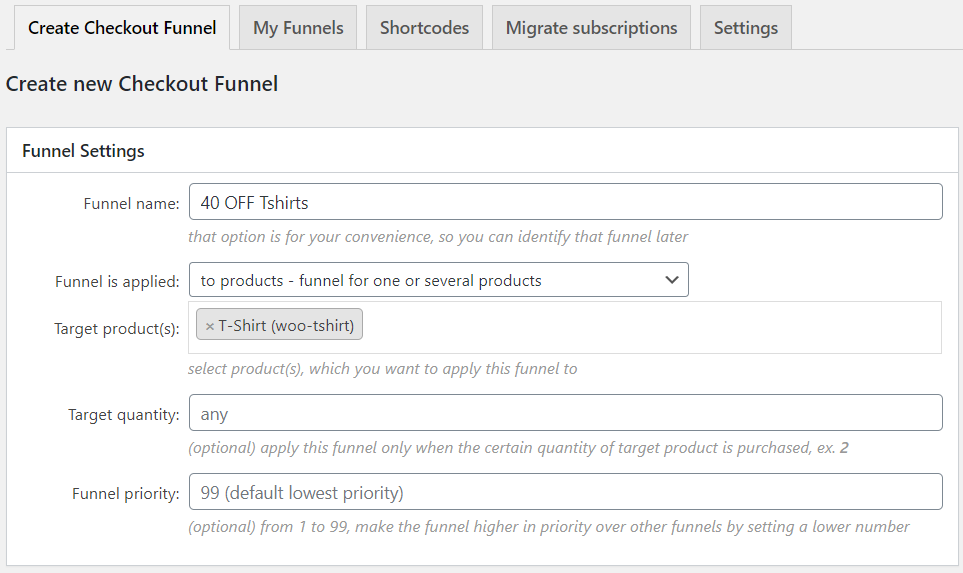
The dashboard displays information about the existing funnels, shortcodes, and settings. To set up a funnel, go to the first tab, “Create Checkout Funnel”.

You can see several fields that take the relevant information about the funnel in the funnel setup form. The first field is the funnel’s name, an important consideration because this is how you could identify a certain funnel from the list of funnels.
As you can see, I have used “40 OFF Tshirts” as the funnel name. This identifies this funnel as a part of the campaign where the customers could get a t-shirt for a 40% discount). The next important setting is the trigger that activates the funnel.
Now, this trigger can be a broad product (such as t-shirts), price range, or similar attributes. To demonstrate this, I will apply the funnel to the entire “t-shirts” category.
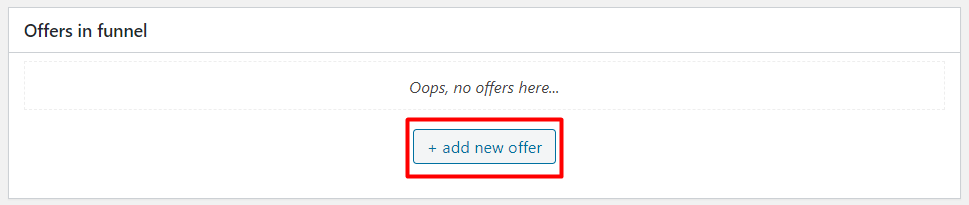
Add The Upsell Offer
Now that the funnel has been created, the next step is adding the offers for the funnel.
A great feature of the plugin is the ability to cascade offers. This allows you to “improve” the offer if the buyer skips/rejects the first offer a good example is to increase the discount percentage if the first offer is rejected).
I will now demonstrate how to add a basic offer to the funnel. The option is located right below the funnel settings.
Click “Add New Offer” to add the new offer.
In the form that opens, you can see the options for when the buyer accepts the offer (Buy Now) and reject them (No Thanks). If the buyer accepts the offer, the funnel directs them to the Order Confirmation page. However, if they reject the offer, you have the offer to show the next offer in the line. You can do this by selecting the next offer in the No Thanks dropdown menu.
For this guide’s purpose, I will leave the default settings that direct the buyers to the Order Confirmation page in both cases.
There are times when you might wish to cancel the original order because the offer upgrades the products and cannot be accommodated in the pre-checkout process. This is rather uncommon, and I recommend keeping the box unchecked to keep things simple.
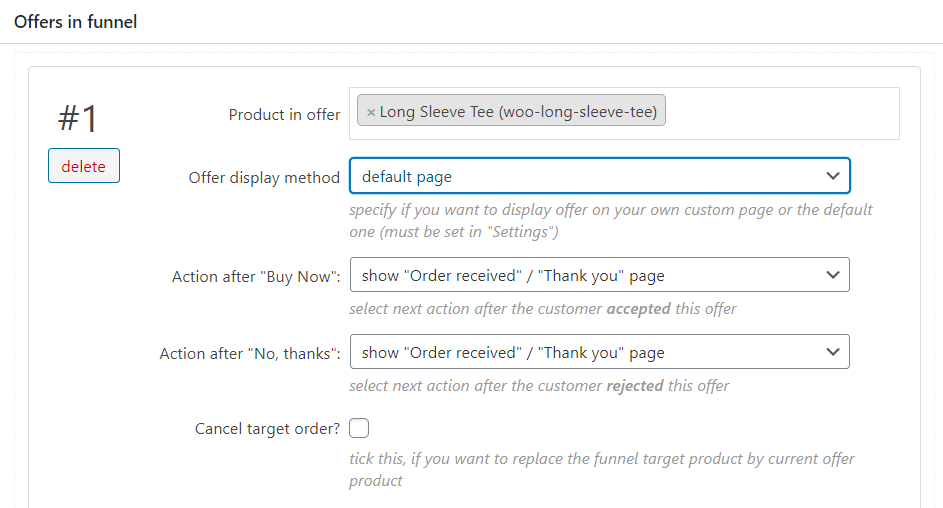
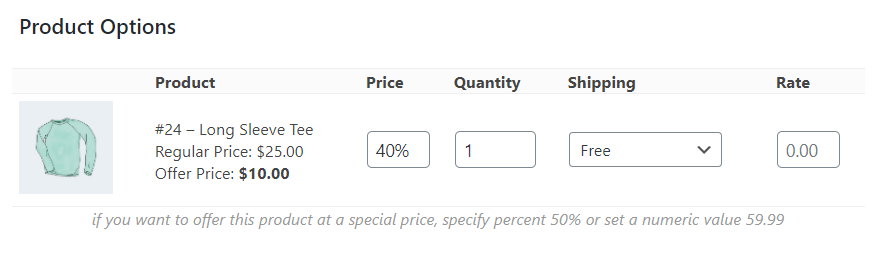
The next important step is choosing the product(s) that would form the part of the offer. The good thing is that you can search for any product in the store’s inventory. Select the target product, and it will be added to the offer.
For this, go to the next “Product Options” section, where you can add the discount and/or additional benefits. In almost all cases, this could take three forms:
- A percentage reduction of the price
- An additional quantity of the product
- Changes to shipping charges (either waived off, flat rate, or reduction as the order size increases)
To demonstrate this, I will offer a combination of all three benefits:
- Price reduction (40% OFF on the product price)
- Additional product (a single long-sleeve t-shirt)
- Changes to shipping charges (free)
Now that you have set up the funnel and the offer(s), you can move on to the final section, where you have additional settings for the funnel. I would like to highlight a couple of options here:
You can create a tracking code for the funnel. However, this is unnecessary because the plugin tracks the buyer and displays the information on the dashboard.
An interesting option is the “Skip Offer” checkbox that skips the offer if a buyer places the order for the product included in the offer.
The final option of allowing the buyer to change the quantity of the product they can buy at the discounted terms. Allowing this is a business decision, but in general, this could be considered a good thing because it could potentially move the inventory faster. For this demo, I will leave it unchecked.
Test & Evaluate
At this point, the funnel is good to go. It is time to take it live and check out how it performs (and contributes to the store performance metrics).
Finalize the process by clicking “Save Changes.” This will save the configuration and redirect you to the dashboard, where you can see the funnel.
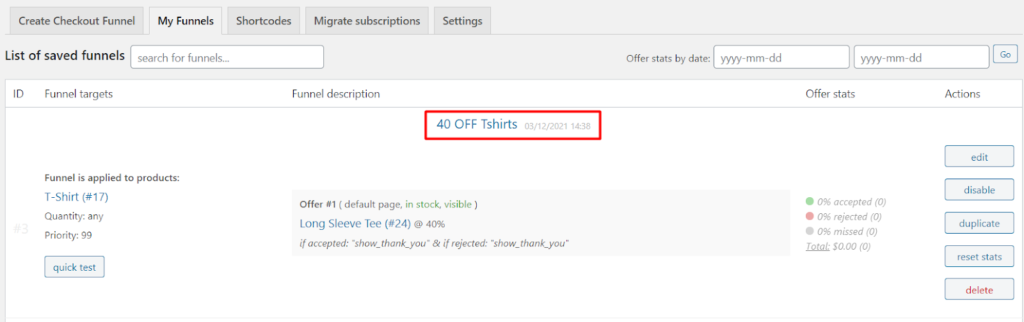
In the “My Funnels” tab, you can see all the active funnels. On the left, under the Funnel targets, you can see the funnel’s statistics and performance. On the right, you have several actions (edit, disable, duplicate, reset stats, delete) that affect the funnel.
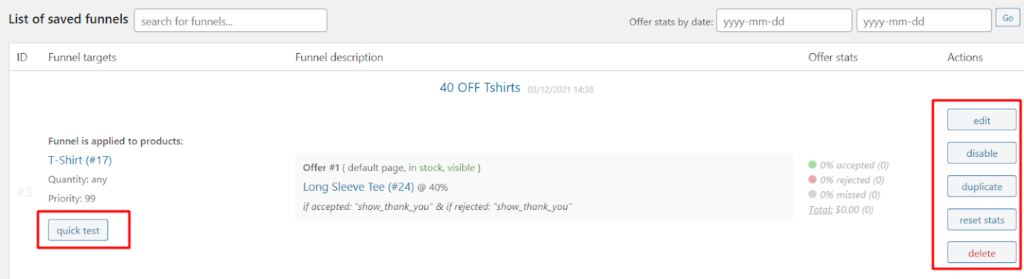
Here is how you can test the funnel operation:
Click “quick test” to visit the Cart page with a product already in the checkout process.

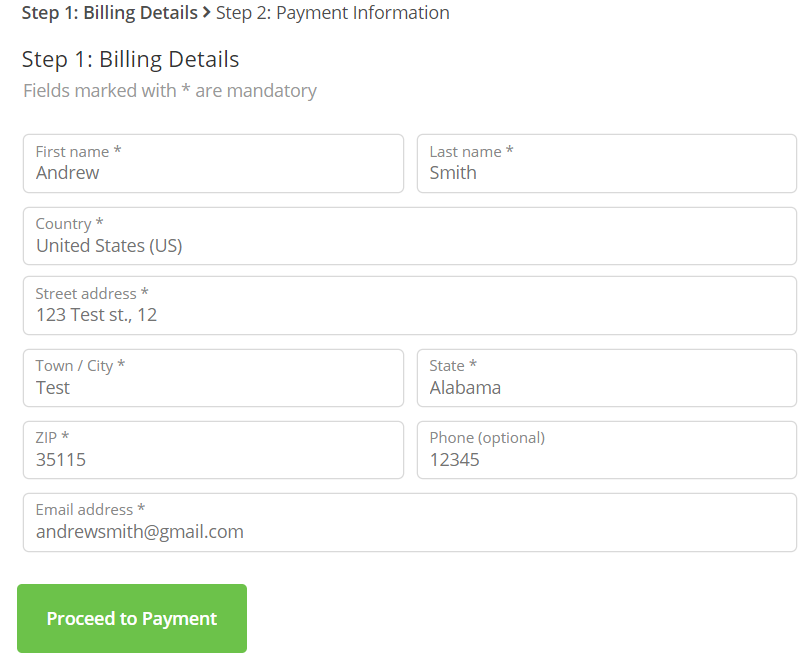
Click “Proceed to Checkout” to initiate the checkout process. Since I am testing funnel, this essentially simulates the user experience of going through the checkout process. During this, the offer is triggered right after the Billing Details and Payment Information.
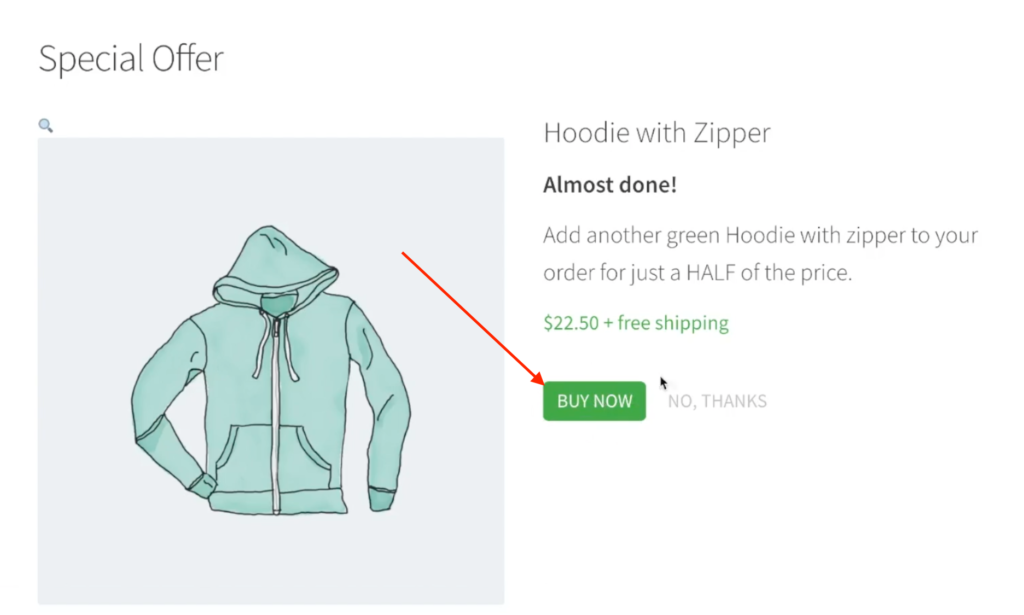
Once the order has been placed, the offer is triggered and you will see the “special offer” page.
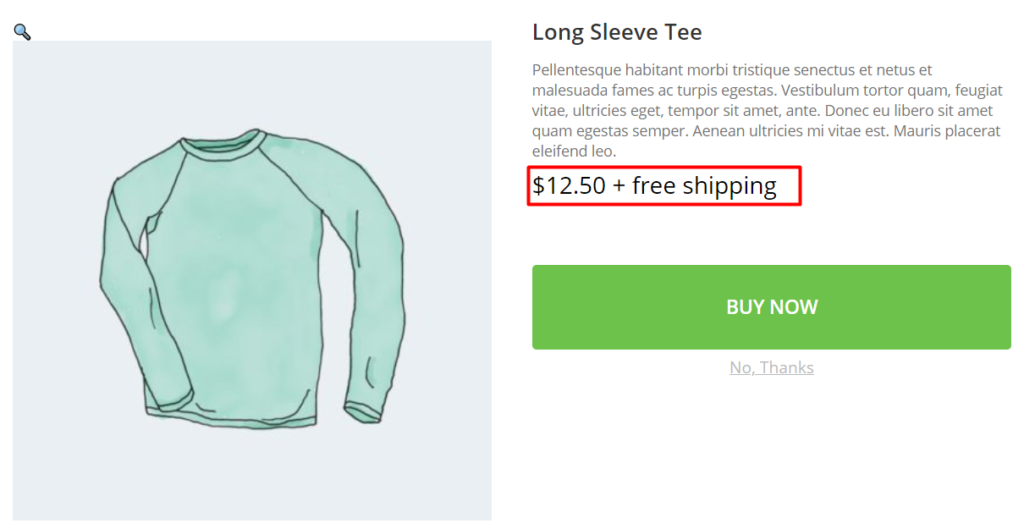
As you can see, the price discount and the free shipping are displayed as per the funnel offer. At this point, I suggest you accept the offer and check if the transaction parameters (price, order size, and shipping rates) change to reflect the success of the offer on the Order Summary page.
Next, do a quick test again, and this time refuse the offer, just to see the impact on the final order.
Final Words
Upselling is a powerful tactic that could significantly contribute to the business revenues and store reputation. One-Click Upsell plugin is a very powerful option for setting up, testing, and monitoring upsell funnels that present great bargains to the buyers.

![WooCommerce Statistics [Infographic]](https://hollerwp.com/wp-content/uploads/2017/07/woo-stats-1200-1024x538.png)